
Project 3: Give Nonprofits the ability to dynamically search for/create donors, allocate donation amount distributions among multiple donors and complete a donation assessment with Lightning Web Components

Hello readers! I hope that you are having a great start to your New Year! I am excited to cover my first project of 2020. In this project, we will talk about implementing Lightning Web Components within a Salesforce quick action and communicating between the two, debouncing methods for effective database searching, leveraging some cool out of the box lighting web components such as the lighting pill container and lightning progress bars and creating a custom wizard to navigate a user through a process. Let's cover the technical principles covered with this project:
Debouncing vs. Throttling algorithms. Whats the difference and why does it matter?
Deconstructing a JSON object into wrapper objects in Apex from LWC
Lightning Web Components communicating with Aura Components through events
As always, I like to start with an overall business problem that we are trying to solve:
The Denver Gives Network is in need of the ability to complete a donation assessment on all of their opportunities that will give them key insights into who is donating, how much each donor is giving, which sector of the organization the funds are being donated to and which marketing method was the most effective.
Let's start with a simple quick action. We know that currently, LWC does not support the use of quick actions, therefore we must embed a Lightning Web Component into an Aura Component and pass along the record Id (in this case an Opportunity Id) into the LWC. Once we do that, we can continue like normal through our journey of building the application. Just a reminder: You can use Lightning Web Components in Aura Components but not the other way around. Here's a quick look at the code:
<aura:component implements="force:hasRecordId, force:lightningQuickAction">
    <c:lwcQuickActionWizard recordid="{!v.recordId}" oncloseaction="{!c.handleEvent}"></c:lwcQuickActionWizard>
</aura:component>
Above we can see on the highlighted line, we are calling the lwcQuickActionWizard from the Aura Component and passing in the record Id. We will get to the oncloseaction piece a little later. This gives us the ability to call a LWC and use it inside of a quick action modal. So now, lets take a look at the component itself:
import { LightningElement, api, track, wire } from 'lwc';

export default class LwcQuickActionWizard extends LightningElement {

    @api recordid; // record Id received from Lightning Component
}
The highlighted line above shows how we utilize the api module/decorator to receive the record Id so that we can perform our functionality in the application. It's important to note that this works the same way with design attributes in Aura Components that can be used to build configuration for Lightning Web Components.
Let's talk about Throttling and Debouncing algorithms in JavaScript. But first, what does this even mean? Both of these terms, while they look confusing, just mean that we want to be mindful about the performance of our application as we make calls to the database and communicate with events. These are especially useful when implementing event handlers. In the application we are reviewing today, we use it twice. Here is an excellent visualization as well. So what is the difference?
You just got to one of your favorite restaurants and the host asks you how many and if you would like to sit in the throttling section or the debouncing section. Puzzled, you stare blankly for a second and then ask what the difference is. They explain that:
In the throttling section, your server will come by on three minute intervals and ask if you want to order anything. Immediately after, your server will take your order directly to the kitchen and they will start cooking your food. They will keep doing this until you either leave or tell them to stop.
In the debouncing section of the restaurant, as long as you keep adding things to your order, the server will hold off going to the kitchen. Only when five minutes has elapsed since your last modified order will the server deliver your order to the kitchen.
The main difference between the two is that throttling guarantees a regular interval of execution for the functions within your application. But when is appropriate to use them?
Infinite Scrolling
With throttling, infinite scrolling would be a great tool because we could regularly check how far the user is from the bottom of the list and keep requesting content to show the user. Debouncing would not help us here because it would only work when the user stops scrolling and we want to slightly stay ahead of the user to provide a rich experience.
Searching
When searching, especially on the Salesforce platform, it means that we are going to be interacting with the database to some degree. Let's say that for an onchange event to an input field, we want to go search the database for an item pertaining to that search. It would be very burdensome to solve this with throttling and we wouldn't really know a proper interval thats sufficient for searching and rendering results. With debouncing, we can execute after the user has finished typing (or an elapsed time) saving the amount we are needing to interact with the database. Here are two areas within our application where we are performing this. Let's walk through them:
handleInput(event) {
    if (this.delayTimeout) {
        window.clearTimeout(this.delayTimeout);
    }
    const searchKey = event.target.value;
    this.delayTimeout = setTimeout(() => {
        this.searchKey = searchKey;
    }, DELAY);
}
handleDonationInput(event) {
if (this.delayTimeout) {
window.clearTimeout(this.delayTimeout);
}
this.newVal = event.target.value;
this.donationAmount = event.target.value;
this.delayTimeout = setTimeout(() => {
let [oldValue, newValue] = this.cleanAmountValues(this.oldVal, this.newVal);
// Prevents the anchor element from navigating to a URL.
event.preventDefault();
// Creates the event with the contact ID data.
const selectedEvent = new CustomEvent('donationchange', { detail: { newVal: newValue,
index: this.itemIndex,
absent: newValue === 0 ? true : false}
});
this.dispatchEvent(selectedEvent);
this.oldVal = newValue;
}, DELAY);
}In handleInput, we are debouncing the onchange event on the dynamic search to wait 300 MS after the typing stops before we actually search for the key term. In handleDonationInput, we are using the input to relate back to the donors they correspond to. However, we don't want to dispatch an event every single time a number is entered. For instance, $10,000 would yield five separate event invocations. With debouncing, we can limit it to one event which is much more performant.
Moving on, let's cover some of the cool out of the box Lightning Web Components that we can leverage in our applications. Let's start with the lightning-pill-container.
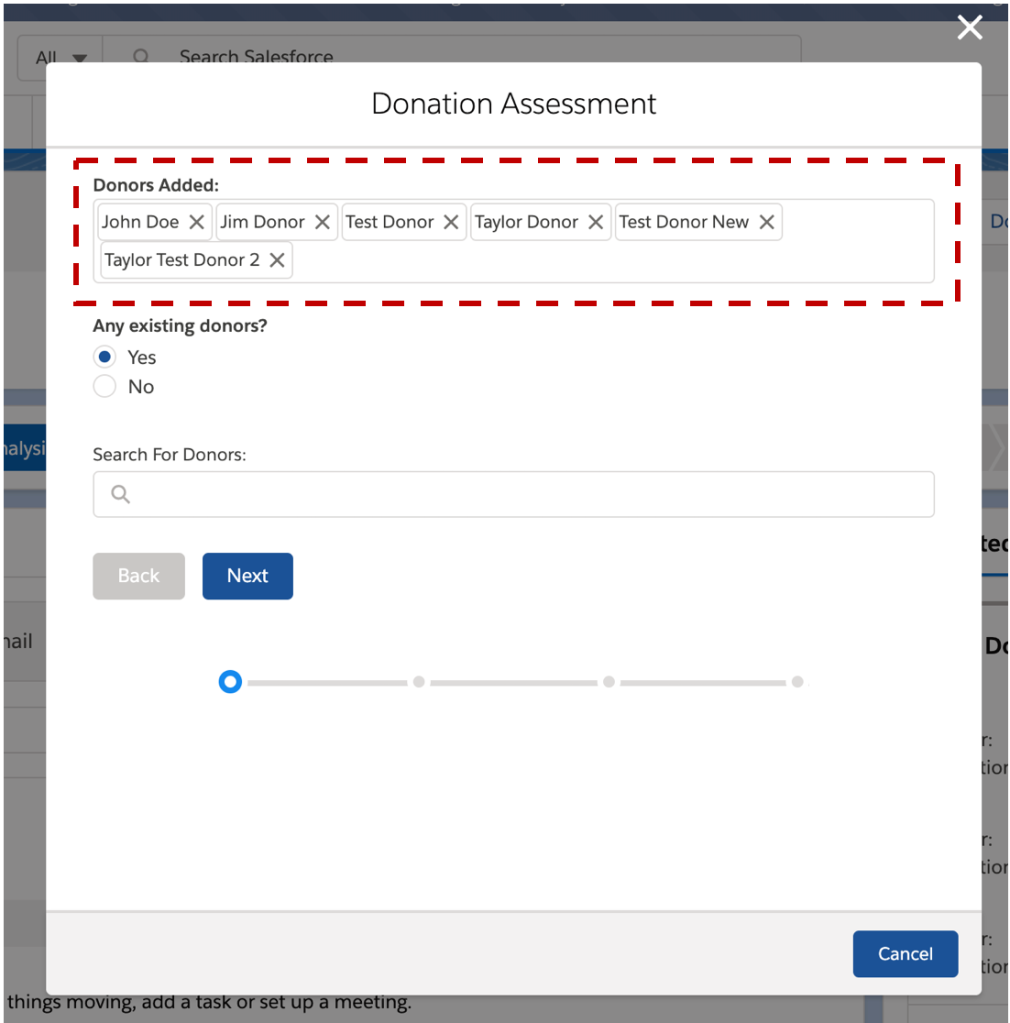
With the lightning-pill-container, it needs a minimum of a label and name that represents an array of objects. With this, we can show pills in the container that represents users or contacts. Here is what the code looks like:
<lightning-pill-container items={items} onitemremove={handleItemRemove}></lightning-pill-container>items = [
{
type: 'avatar',
href: 'https://www.salesforce.com',
label: 'Avatar Pill 1',
src: 'https://www.lightningdesignsystem.com/assets/images/avatar1.jpg',
fallbackIconName: 'standard:user',
variant: 'circle',
alternativeText: 'User avatar',
isLink: true,
}
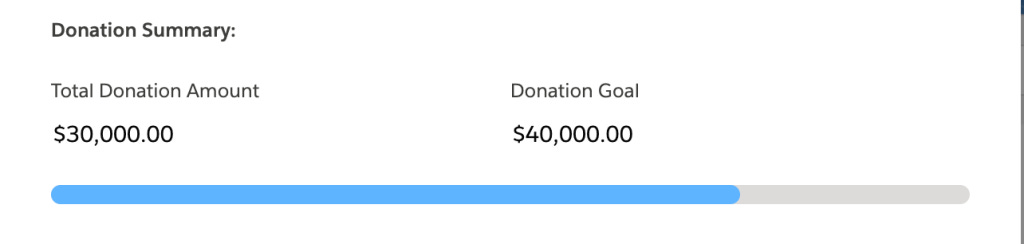
];lightning-progress-bar and lightning-progress-indicator give us the ability to show progress through something like a wizard navigation or showing a certain percentage of progress. Here are the two we used in the application and the code required to build it:
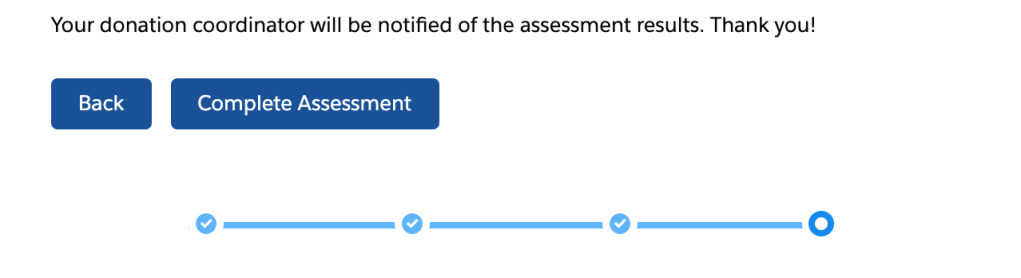
<lightning-progress-indicator current-step={progress} type="base" variant="base">
            <lightning-progress-step label="Step 1" value="0"></lightning-progress-step>
            <lightning-progress-step label="Step 2" value="1"></lightning-progress-step>
            <lightning-progress-step label="Step 3" value="2"></lightning-progress-step>
            <lightning-progress-step label="Step 4" value="3"></lightning-progress-step>
        </lightning-progress-indicator>
<lightning-progress-bar value={donationProgress} size="large" variant="circular"></lightning-progress-bar>When writing back data to insert a list of records, one of our options is to JSON.stringify() an array of objects and pass them into an Aura Enabled Apex method to parse and assign. In this example, we are performing this action when 'Complete Assessment' is invoked:
creationDonations() {
    const donations = JSON.stringify(this.items);
    generateDonations({donations: donations, oppId: getFieldValue(this.opp, ID)})
    .then(result => {
        if (result) {
            this.dispatchEvent(new CustomEvent('closeaction'));
            this.dispatchEvent(
                new ShowToastEvent({
                    title: 'Assessment Completed!',
                    message: 'Thanks for completing the assessment! Your donations have been generated',
                    variant: 'success',
                }),
            );
        }
    });
}
Above we are stringifying the items list that contains all of the donation information and then passing it, along with the Opportunity Id, as a string to our Apex method:
public class DonorSearch {

    public static final Id recordTypeId = Schema.SObjectType.Contact.getRecordTypeInfosByName().get('Donor').getRecordTypeId();

    @AuraEnabled(Cacheable=true)
    public static List<Contact> findContacts(String searchKey) {
        if (String.isBlank(searchKey)) {
            return new List<Contact>();
        } else {
            String enhancedTerm = '%' + searchKey + '%';
            List<Contact> contacts =  [SELECT Id, FirstName, LastName, MailingAddress FROM Contact WHERE (FirstName LIKE :enhancedTerm OR LastName LIKE :enhancedTerm) AND RecordTypeId = :recordTypeId];
            return contacts;
        }
    }

    @AuraEnabled
    public static Boolean generateDonations(String donations, String oppId){

        List<Donation> records = (List<Donation>) System.JSON.deserialize(donations, List<Donation>.class);

        List<Donation__c> donationRecords = new List<Donation__c>();
        for (Donation theDonation : records) {
            Donation__c donation = new Donation__c();
            donation.Donation_Amount__c = theDonation.donationAmount;
            donation.Donor__c = theDonation.donorId;
            donation.Opportunity__c = oppId;
            donationRecords.add(donation);
        }

        try {
            insert donationRecords;
            return true;
        } catch(exception ex) {
            System.debug('There has been an issue with inserting records. Please review the message: ' + ex.getMessage());
            return false;
        }
    }

    public class Donation {

        public String label;
        public String name;
        public String donorId;
        public Integer donationAmount;

    }
}
Above, we create a wrapper class called Donation that allows us to generate properties to store the information that we are receiving from the Lightning Web Component. We then take the string input, deserialize into a List of Donations. After, it's as simple as looping over the list and constructing our donation records.
Lastly, one of the final steps is closing the quick action after we have completed the assessment. However, we cannot close the quick action directly from the LWC. Due, to this, we have to dispatch an event for the parent Aura Component to receive. Remember this line?
<c:lwcQuickActionWizard recordid="{!v.recordId}" oncloseaction="{!c.handleEvent}"></c:lwcQuickActionWizard>In the createDonations() JS code block above, we are dispatching the 'closeaction' event after the promise has confirmed that they records were successfully created. The Aura Component then receives this event, indicated by the 'oncloseaction' attribute of the component call above and executes the handleEvent call. This should look relatively familiar if you are used to writing Aura Components:
({
    handleEvent : function(component, event, helper) {
        $A.get("e.force:closeQuickAction").fire();
        $A.get('e.force:refreshView').fire();
    }
})
From there, we can receive the event and execute the function that closes the quick action and refreshes the view in Lightning.
As usual, you can access all of the code on my GitHub profile and please let me know if you have any questions. The video below shows the entire functionality overall. Thanks so much for reading and Happy Coding!
https://videopress.com/v/KvN1kEHW?autoPlay=true&loop=true&muted=true&persistVolume=false&preloadContent=metadata