
Introducing Budgie - A native IOS budgeting app with Salesforce that I am building for my family: Phase 1 - Building the OAuth 2.0 User-Agent Flow for Mobile App Integration with Salesforce

Hey readers! With our new baby boy on the way, I started getting REALLY into budgeting. I became super interested in where our money was going and ways that we could improve our spending habits. Initially, I designed and built out an entire budgeting framework in Google Sheets that we currently use. The framework covers our non-discretionary/discretionary spending and even tracks what we are able to save each month and provides some cool projections on where we are heading if we keep up the good work. The nice thing about non-discretionary spending is that it's fixed. Once I create it, it just gets applied every month and it's accounted for.
But what about discretionary? Since we committed to a more granular approach to track our spending, we are typically logging each expense title, amount and category that it falls into such as Shopping, Eating out, Groceries, etc. Naturally, since we were having to go to our computer or navigate across a clunky UI for our google sheets mobile app to log every expense, I started to explore what this would look like as a data model and mobile capability. It would be super cool if we could pop open a mobile app, log an expense and maybe see a couple of cool dashboards on how our monthly spending was looking. I know, I know...there are tons of budgeting apps out there and why would I build my own?
https://videopress.com/v/xLlHvhmC?resizeToParent=true&cover=true&loop=true&muted=true&persistVolume=false&preloadContent=metadata&useAverageColor=true
First, I tried the Salesforce Mobile App. I built this amazing and reactive UI with Lightning Web Components that allowed us to submit expenses and even view a nice dashboard with chartJS on how we were doing overall for the month. I downloaded the mobile app to start testing and even set up the Salesforce Mobile App on my wife's phone since developer boxes give you two Sys Admin users. Queue the gif...
The app was so unstable and unreliable (love you, Salesforce). Sometimes, the app would just stall out and I would see a lonely Salesforce logo staring at and mocking me. Other times, the IOS app would load but the actual Lightning Web Component Expense App within Salesforce failed to load and would require me to clear the cache in settings and reload. When the LWC loaded, it seemed to work fine but we needed something that we could rely on.
-- Native IOS enters the chat --
I have been wanting an excuse to learn swift and build a mobile app for most of my professional career. I downloaded this IOS Course on Udemy and starting plugging away at it. This blog series is a detailed account of my experiences while taking on this project and will start from the first line of code and end with my submission to the App Store. One important thing to note is that I am not using Salesforce frameworks such as Salesforce Mobile SDK or forceios. I truly want to understand how to build this from scratch before moving to frameworks. Here is a very simple architecture diagram of what I have so far:

When I first started down this road, I was completely lost. My hope is that my hours of searching, reading and learning will benefit you if you ever decide to take something like this on and build your own custom IOS app with Salesforce as a backend.
*** As a side note, this blog post will probably be fairly lengthy. The purpose of Another Coding Blog is to foster a culture of learning and collaboration amongst technologists and I am going to show you everything. For the advanced folks, this might be a little boring if you already know all of this. If you are new to Salesforce and/or Swift/IOS, buckle up! I am also not a Swift/Xcode expert so if you have suggestions or feedback, please leave a comment or email me!!!
Creating your Connected app
Go to settings
App Manager
New Connected App
Connected App Name
API Name
Contact Email
Check Enable Oauth Settings
Establish your Callback URL (this will be your URL Scheme from Xcode - more on that later)
Selected Oauth Scopes (I went a little crazy while testing with this but just make sure you give the proper access you'd like for your user to have)
Save!
You should now have a Client Id and Client Secret created for you. The secret is good for things like username-password type authentication but thats not really scalable or secure as you design an application that can be used by the masses. So for now, we will only need our Client Id.
2. User loads the app from their phone
When a user loads the app on their phone, the first thing you think about is what the actual app logo looks like. Now, I am no designer but I created a free account with Canva and was able to create a pretty decent looking app logo that will be applicable to all compatible Apple device types.
I thought it was kind of cute...a dog (we have a black lab) with tons of money floating on his head. ha ha budget ha ha. Anyway, once I had the app logo, I went to an App Icon Generator to generate the iPhone icon sizes that I could place into my assets folder in Xcode.

Pretty cool right? Once I actually started to get a behind the scenes peak on how IOS mobile apps are built, I became even more fascinated! So now I have my app icon, my xCode project and some user is going to start tapping on it to access the app. So what do I want to happen next?
3. If no access token exist, use the Oauth 2.0 User-Agent Mobile Integration flow with the client id and UIApplication.shared.open() swift function to prompt user auth within the mobile browser
Let's dig into a little bit of code.
//
//  ViewController.swift
//  Budgie
//
//  Created by Taylor Ortiz on 3/29/22.
//

import UIKit


class ViewController: UIViewController {
    @IBOutlet var appBackground: UIView!

    let mobileAppUserAgentFlowBody: String = "response_type=token&client_id=[CLIENT ID FROM YOUR CONNECTED APP GOES HERE]&redirect_uri=[YOUR REDIRECT URI FROM YOUR CONNECTED APP - MINE IS SalesforceAuthentication://]&state=success"

    override func viewDidLoad() {
        super.viewDidLoad()

        // Do any additional setup after loading the view.
        overrideUserInterfaceStyle = .light
        // Use UIApplication.shared.open function to navigate to your default browser for authentication
        UIApplication.shared.open(URL(string: "https://budgetyortiz-dev-ed.my.salesforce.com/services/oauth2/authorize?" + self.mobileAppUserAgentFlowBody)!)
    }
}
Okay so a few things to cover here. ViewController.swift is...you guessed it! All things to control the view of your application. There are many swift related things that we will cover in later blogs such as binding buttons/labels to your code known as an @IBOutlet but we will focus on the viewDidLoad() function for now.
Lets first break down the variable assignment called mobileAppUserAgentFlowBody. If you refer to this Salesforce documentation about OAuth 2.0 flows, you will find this example:
https://login.salesforce.com/services/oauth2/authorize?response_type=token&
client_id=3MVG9lKcPoNINVBIPJjdw1J9LLJbP_pqwoJYyuisjQhr_LLurNDv7AgQvDTZwCoZuDZrXcPCmBv4o.8ds.5iE&
redirect_uri=https://www.customercontactinfo.com/user_callback.jspk&
state=mystate
So, we simply follow the same structure.
The response_type is a token issued by the authorization server. For more on response types, check out this awesome post by Okta.
The client_id is the id that was issued to you by your connected app. Something to note here: The redirect uri in most cases outside of app development is a standard HTTPS url. In this case, since IOS requires us to create a URL Scheme, the structure is a bit different and typically is myapp://. Whats cool is that once you create and register your URL Scheme with your Xcode app, you could literally go to your mobile browser, type in myapp:// (or whatever your scheme was) and be redirected to your app.
The redirect_uri is where the user is redirected to after successful authentication.
The state is any state that the external web service requests to be sent back to the callback URL.
4. User authorizes the mobile app to access data and the connected app receives the access token as an HTTP redirection
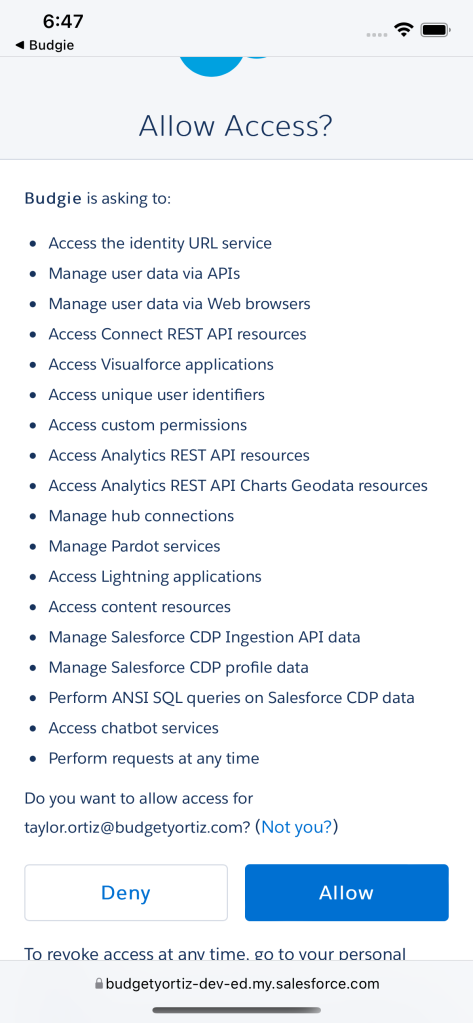
Okay, I went a little overboard with the amount of access I am granting my user. However, I just wanted to test it out to make sure that everything would work and get passed over in the response. Look familiar? If it does, thats because its the whole scope of what you will allow to be passed over to the user that is logging in to interact with your application. Once you select allow, some pretty cool stuff starts to happen!
5. Create a URL Scheme to support callback app redirection

This is a URL Scheme in Xcode. This matters because it defines a unique attribute that it tied to your app. This is how the browser can know that your app has an identity that it can redirect and pass information back to when navigating from an outside source. You can even navigate from app to app this way! Its pretty cool. Here is more information on URL Schemes but just know that you must have it so that you can establish the correct callback mechanism for your app. Once you add this, it automatically gets added to your info.plst file within your Xcode project that stores all of your configuration data.
6, 7 & 8. Capture the url that is sent back from Salesforce once you have successfully proven that you are authorized and you have allowed the connected app to access your data
Lets look at a bit of code.
//
//  SceneDelegate.swift
//  SalesforceAuthentication
//
//  Created by Taylor Ortiz on 3/29/22.
//

import UIKit

class SceneDelegate: UIResponder, UIWindowSceneDelegate {

    var window: UIWindow?


    func scene(_ scene: UIScene, willConnectTo session: UISceneSession, options connectionOptions: UIScene.ConnectionOptions) {
        // Use this method to optionally configure and attach the UIWindow `window` to the provided UIWindowScene `scene`.
        // If using a storyboard, the `window` property will automatically be initialized and attached to the scene.
        // This delegate does not imply the connecting scene or session are new (see `application:configurationForConnectingSceneSession` instead).
        guard let _ = (scene as? UIWindowScene) else { return }
    }

    func sceneDidDisconnect(_ scene: UIScene) {
        // Called as the scene is being released by the system.
        // This occurs shortly after the scene enters the background, or when its session is discarded.
        // Release any resources associated with this scene that can be re-created the next time the scene connects.
        // The scene may re-connect later, as its session was not necessarily discarded (see `application:didDiscardSceneSessions` instead).
    }

    func sceneDidBecomeActive(_ scene: UIScene) {
        // Called when the scene has moved from an inactive state to an active state.
        // Use this method to restart any tasks that were paused (or not yet started) when the scene was inactive.
    }

    func sceneWillResignActive(_ scene: UIScene) {
        // Called when the scene will move from an active state to an inactive state.
        // This may occur due to temporary interruptions (ex. an incoming phone call).
    }

    func sceneWillEnterForeground(_ scene: UIScene) {
        // Called as the scene transitions from the background to the foreground.
        // Use this method to undo the changes made on entering the background.
    }

    func sceneDidEnterBackground(_ scene: UIScene) {
        // Called as the scene transitions from the foreground to the background.
        // Use this method to save data, release shared resources, and store enough scene-specific state information
        // to restore the scene back to its current state.
    }

    func scene(_ scene: UIScene, openURLContexts URLContexts: Set<UIOpenURLContext>) {
        for urlContxt in URLContexts {
            var responseURL: URL = urlContxt.url
            // responseURL is the variable that contains your access token.
        }
    }

}
So the final step is to capture the url that contains your access token and refresh token but how? SceneDelegate! Specifically the hook function that they give you by default called scene(_ scene: UIScene, openURLContexts URLContexts: Set<UIOpenURLContext>). This function allows your to capture the url through the UIOpenURLContexts and extract out your access and refresh token with some simple regex. Here is what a sample successful response will look like from the one I mentioned above that came from Salesforce:
https://www.customercontactinfo.com/user_callback.jsp#
access_token=00Dx0000000BV7z%21AR8AQBM8J_xr9kLqmZIRyQxZgLcM4HVi41aGtW0qW3JCzf5xd
TGGGSoVim8FfJkZEqxbjaFbberKGk8v8AnYrvChG4qJbQo8&
refresh_token=5Aep8614iLM.Dq661ePDmPEgaAW9Oh_L3JKkDpB4xReb54_pZfVti1dPEk8aimw4Hr9ne7VXXVSIQ%3D%3D&
instance_url=https://yourInstance.salesforce.com&
id=https://login.salesforce.com%2Fid%2F00Dx0000000BV7z%2F005x00000012Q9P&
issued_at=1278448101416&
signature=miQQ1J4sdMPiduBsvyRYPCDozqhe43KRc1i9LmZHR70%3D&
scope=id+api+refresh_token&
token_type=Bearer&
state=mystate
See the callback url at the beginning with all of the url parameters attached to it? Thats the magic! Now we are able to make endless RestAPI calls to Salesforce to POST and GET data to show on our app and give our users a seamless experience as they interact with Salesforce on the backend. See the video below (if you have gotten this far) on what the full regression looks like.
For the next blog, we will be focusing on building out the UI and the REST API calls to Salesforce that will allow us to create expense records and hopefully my wife and I can start using this super cool app very soon! Thank you so much for reading and if you have any questions or comments, do not hesitate to reach out.
Happy Coding!